SpringSecurity实现基本认证和授权
1. 环境准备
1.1 构建springboot框架
本篇博客是基于springboot构建springsecurity,因此需要导入springboot相关的依赖.
由于我用的IDE是IDEA,因此可以直接在IDEA里面构建springboot项目(如果是用其他IDE就需要手动构建项目结构或者在spring官网
在线构建springboot并下载下来).

目前spring官网在这里选择JAVA版本的时候是17和19都有,就是没有18,而博主之前一直用的18:smirk:,所以我在这里也没有更换18到其他版本,就暂时先按照
自己电脑装的版本填就行,后面在pom.xml文件里面指定一下java版本就行。
1.2 导入相关依赖
由于springboot默认是maven项目,因此可以在pom.xml文件里直接导入依赖,就不用手动导入jar包。

<?xml version="1.0" encoding="UTF-8"?>
<project xmlns="http://maven.apache.org/POM/4.0.0" xmlns:xsi="http://www.w3.org/2001/XMLSchema-instance"
         xsi:schemaLocation="http://maven.apache.org/POM/4.0.0 https://maven.apache.org/xsd/maven-4.0.0.xsd">
    <modelVersion>4.0.0</modelVersion>
    <parent>
        <groupId>org.springframework.boot</groupId>
        <artifactId>spring-boot-starter-parent</artifactId>
        <version>2.7.4</version>
        <relativePath/> <!-- lookup parent from repository -->
    </parent>
    <groupId>com.yellow</groupId>
    <artifactId>spring_security</artifactId>
    <version>0.0.1-SNAPSHOT</version>
    <name>spring_security</name>
    <description>spring_security</description>
    <properties>
        <java.version>18</java.version>
    </properties>
    <dependencies>
        <dependency>
            <groupId>org.springframework.boot</groupId>
            <artifactId>spring-boot-starter-security</artifactId>
        </dependency>
        <dependency>
            <groupId>org.springframework.boot</groupId>
            <artifactId>spring-boot-starter-web</artifactId>
        </dependency>

        <dependency>
            <groupId>org.projectlombok</groupId>
            <artifactId>lombok</artifactId>
            <optional>true</optional>
        </dependency>
        <dependency>
            <groupId>org.springframework.boot</groupId>
            <artifactId>spring-boot-starter-test</artifactId>
            <scope>test</scope>
        </dependency>
        <dependency>
            <groupId>org.springframework.security</groupId>
            <artifactId>spring-security-test</artifactId>
            <scope>test</scope>
        </dependency>
    </dependencies>

    <build>
        <plugins>
            <plugin>
                <groupId>org.springframework.boot</groupId>
                <artifactId>spring-boot-maven-plugin</artifactId>
                <configuration>
                    <excludes>
                        <exclude>
                            <groupId>org.projectlombok</groupId>
                            <artifactId>lombok</artifactId>
                        </exclude>
                    </excludes>
                </configuration>
            </plugin>
        </plugins>
    </build>

</project>
如果出现没有导入的情况就按照下图刷新一下
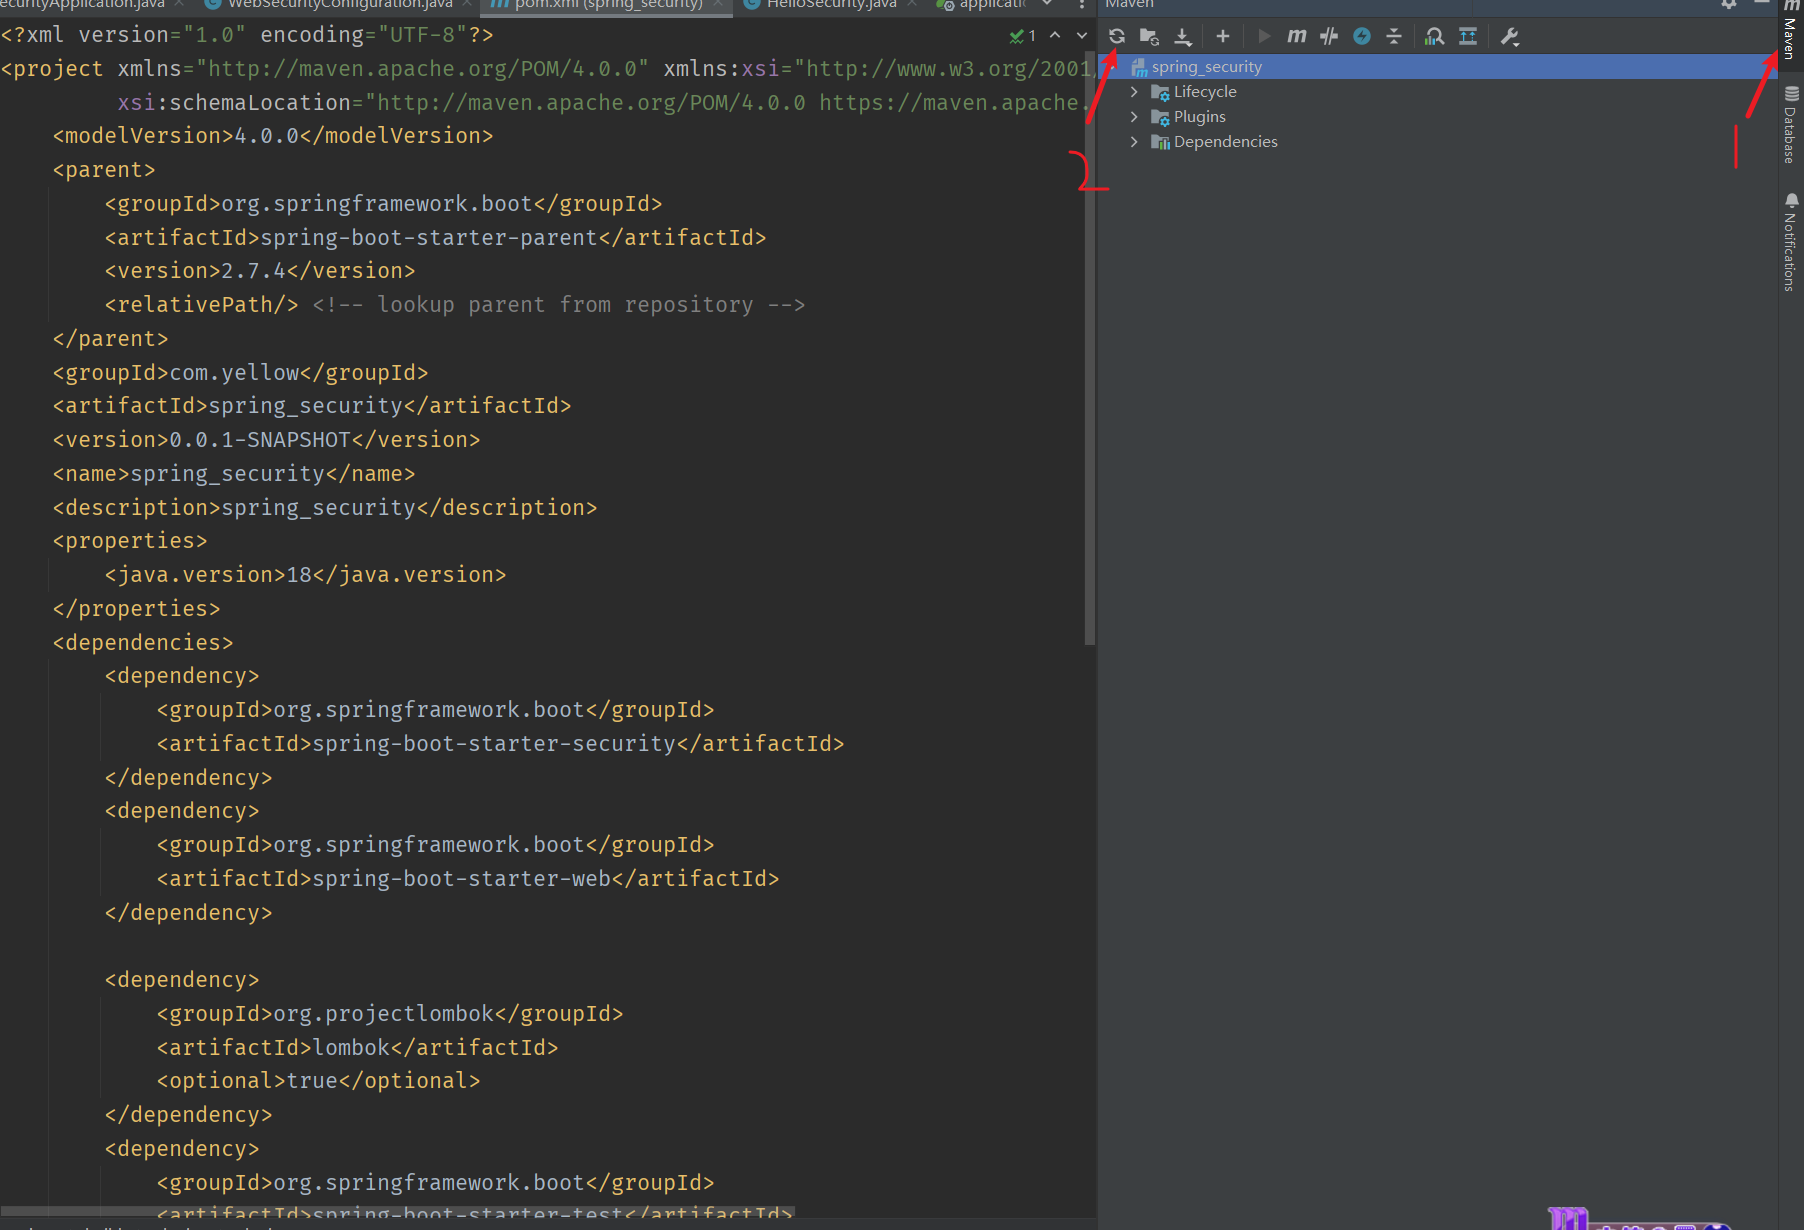
最后在左侧边栏里检查一下自己的包是否导入成功了.(大多数包在IDEA构建的时候是可以选择的,一般不用再手动写pom.xml了,这里只是演示可能因为种种因素没有自动导入而需要手动写pom.xml的情况,如果你构建好之后已经有这些包了请忽略此步骤!)
2. 编写Controller类并初步测试
2.1 编写Controller类
@RestController
@RequestMapping("/hello")
public class HelloSecurity {

    @RequestMapping("/world")
    public String helloSecurity(){
        return "hello security";
    }
2.2 启动springboot项目

如果你的包都导入正确了,这里就会出现springsecurity自带的一串密码,下文提到怎么自定义密码.
现在我们来访问8080端口
http://localhost:8080/hello/world此时需要输入用户名和密码,因为springsecurity默认是帮我们做了拦截

username:user
password:你自己生成的密码(b9e1a7ef-e7ca-40e6-b0d7-25c07e26ea6e)
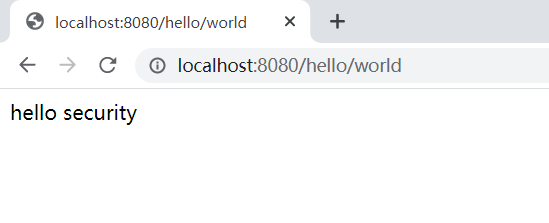
ok,通过输入用户名和密码我们就能够正确访问到controller接口了
2.3 自定义用户名和密码
下面我们来在application.yml里面自定义用户名和密码
#spring:
#  security:
#    user:
#      name: admin
# password: 1037hjy比如上面定义的,注意:博主在测试的时候一开始的密码定义为了000000,发现总是登不进去,后来改为了其他比较复杂一点的密码就能登进去了,新来的小伙伴要注意一下.
3. 认证和授权简单实现
大家有没有发现如果用户个数增多了,我们就需要在yml文件里面一个一个增加用户,这样不仅造成文件体积庞大而且不便于维护
因此我们可以自己写配置类来认证用户,顺便把相应权限给他们,岂不是美滋滋!
首先我们先把官方的自动配置给注释掉
3.1 认证
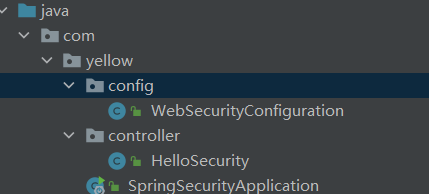
新建一个controller包,并且建立WebSecurityConfiguration类,这里可以小伙伴自己命名,注意config包一定要和springboot主启动类同级目录
编写方法并继承WebSecurityConfigurerAdapter类,这里我们继承后就可以自定义需要认证的角色了
package com.yellow.config;

import org.springframework.context.annotation.Bean;
import org.springframework.context.annotation.Configuration;
import org.springframework.security.config.annotation.authentication.builders.AuthenticationManagerBuilder;
import org.springframework.security.config.annotation.web.configuration.EnableWebSecurity;
import org.springframework.security.config.annotation.web.configuration.WebSecurityConfigurerAdapter;
import org.springframework.security.crypto.bcrypt.BCryptPasswordEncoder;
import org.springframework.security.crypto.password.PasswordEncoder;

@Configuration
@EnableWebSecurity
public class WebSecurityConfiguration2 extends WebSecurityConfigurerAdapter {
    @Override
    protected void configure(AuthenticationManagerBuilder auth) throws Exception {

        PasswordEncoder pe=passwordEncoder();
        auth.inMemoryAuthentication().
                withUser("admin").
                password(pe.encode("000000")).
                roles();
        auth.inMemoryAuthentication().
                withUser("user").
                password(pe.encode("123456")).
                roles();
    }

    @Bean
    public PasswordEncoder passwordEncoder(){
            return new BCryptPasswordEncoder();
    }
}
虽然现在WebSecurityConfigurerAdapter类被官方标记为过时的类,但是还能用,这里主要是和下文讲的目前新的实现方法进行对比,择优选择,因为我觉得最新的也不一定是最好的,总之‘’仁者见仁智者见智‘’嘛
我简单说明一下各部分的作用
-
@Configuration表示这是一个配置类,相当于spring里面的xml配置文件,学过spring的朋友应该都知道IOC控制反转和DI依赖注入,这里@Bean就相当于配置文件中配置Bean,来实现所有相关类统一交给spring容器管理,更多的细节就不再赘述。
-
@EnableWebSecurity 顾名思义,开启security功能,因为我们要告诉spring我们现在配置的是websecurity相关的类,不然就不会生效
-
PasswordEncoder 这里是一个加密类,因为我之前测试过,为了节省大家的时间以及避免大家踩坑,简而言之就是如果你在password(pe.encode("000000"))里面直接写000000,验证登录时就会报错,因此springsecurity默认要我们对密码加密,避免明文传输
加密规则可以自己定义,不一定要BCryptPasswordEncoder.
ok,其他部分就没有什么可说的了,这里就定义了两个用户,一个admin,一个user.你们以后写项目一定也有管理员用户和普通用户.你们可以自己测试,登录没问题的话认证就搞定了.
PS:认证这个词不一定非要是一个用户,它可以是很多类型,比如一个设备,一个厂商都可以是被认证的对象,我们可以统一为角色
3.2 授权
授权功能得先在配置类上加上@EnableGlobalMethodSecurity(prePostEnabled = true)的注解,代表在方法上开启安全验证,实际就是写controller类
的方法.
上面不是还有一个坑没有填吗,不知道细心的小伙伴注意到没有,就是

这里再怎么看都应该填些参数啊,不然roles放这里既没用又占空间
没错,这里就是来说明给当前用户授予哪些权限的
 auth.inMemoryAuthentication().
                withUser("user").
                password(pe.encode("000000")).
                roles("normal");
        auth.inMemoryAuthentication().
                withUser("admin").
                password(pe.encode("123456")).
                roles("normal","vip");
比如我这里给admin管理官一个普通权限和一个vip权限,代表管理员既能访问到普通用户能访问到的页面,也能访问到vip页面,权限更多。
而user用户就只能访问到普通页面,换句话说就是得加钱:cry:.
然后我们还有一步重要的事情,就是配置controller类,在以后的项目中不同的链接地址需要得到相应的许可才可以访问
package com.yellow.controller;

import org.springframework.security.access.prepost.PreAuthorize;
import org.springframework.web.bind.annotation.RequestMapping;
import org.springframework.web.bind.annotation.RestController;

@RestController
@RequestMapping("/hello")
public class HelloSecurity {

    @RequestMapping("/world")
    public String helloSecurity(){
        return "hello security";
    }

    @RequestMapping("/helloVip")
    @PreAuthorize(value = "hasAnyRole('vip')")
    public String helloVip(){
        return "欢迎vip用户!";
    }

    @RequestMapping("/helloUser")
    @PreAuthorize(value = "hasAnyRole('normal','vip')")
    public String helloUser(){
        return "欢迎User用户!";
    }
}
我们在之前controller基础上新增了"/helloVip"和"/helloUser",并且使用了一个新的注解 @PreAuthorize,这个注解生效得开启前面提到的@EnableGlobalMethodSecurity(prePostEnabled = true).这个注解作用在方法上,代表在进入前授权,value值里面的“normal”和“vip”代表刚刚只有normal和vip用户能进入这个链接,这里对应了配置类roles()里面的参数。
登录admin用户

登录user用户

但是如果用user的账号密码访问vip页面(先清楚浏览器缓存,因为浏览器会自动记录登录信息)
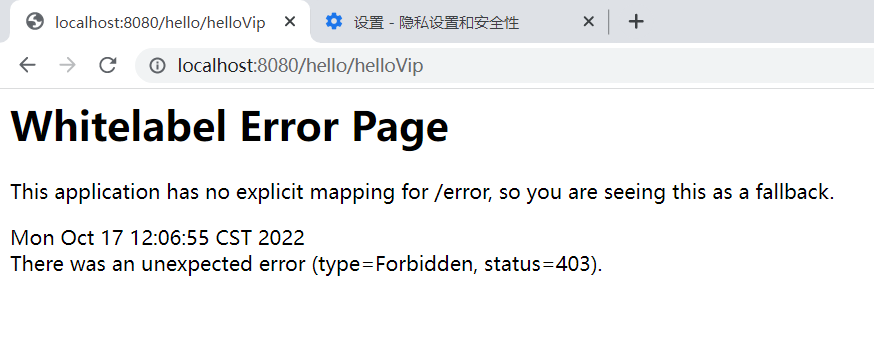
这里user普通用户就被拦截了,因为他没有vip权限,只有roles("normal"),如果你改为roles("vip")就可以访问了
相反,admin用户两个页面都能访问,这就看你自己怎么设置了
OK,到此你已经学会基本的SpringSecurity的认证和授权了
